Main Courses
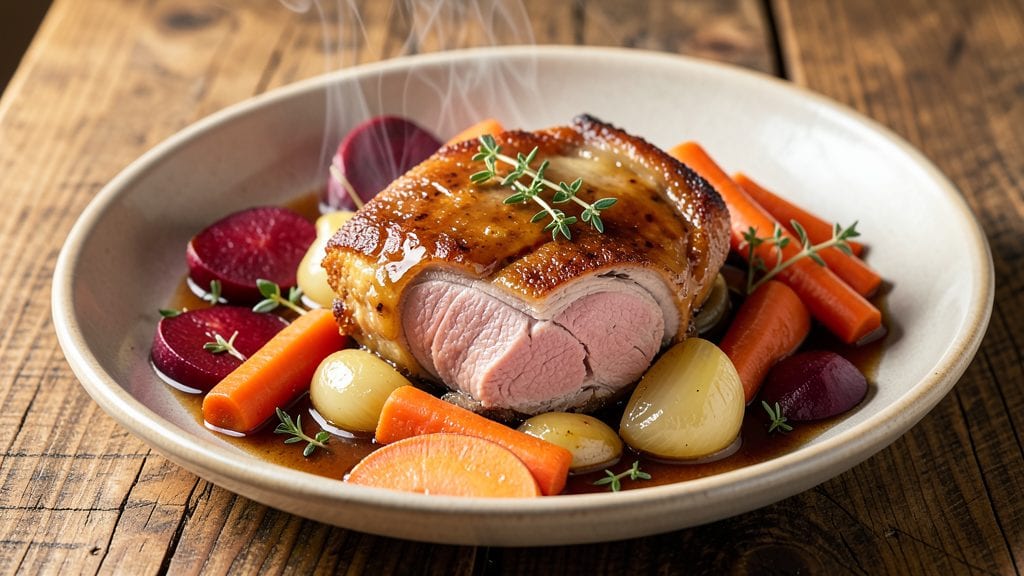
Mastering apple cider braised pork shoulder transforms tough cuts into fall-off-the-bone tenderness with layers of caramelized depth. This recipe blends my years of pitmaster experience with the rustic charm of apple cider—a perfect marriage of slow cooking and seasonal flavors.
The key lies in searing the pork first to lock in juices before it bathes in aromatic vegetables and cider, creating a sauce so rich it deserves its own bowl.
The beauty of this method is its patience—what starts as a simple sear becomes a deeply flavorful dish after hours of simmering. I use a combination of apple cider and broth to balance sweetness with savory notes, while onions, garlic, and thyme build complexity.
The result? Pork that's impossibly tender, with a sauce that's velvety and just sweet enough to make every bite sing. This is the kind of recipe that gets better as it cooks, rewarding your time with restaurant-quality results.
What makes this recipe stand out is its adaptability—whether you're using a Dutch oven on the stovetop or transferring it to the oven, the technique remains the same. The pork develops a caramelized crust from the cider reduction, while the meat stays moist and flavorful.
This dish pairs beautifully with crusty bread to soak up every last drop of that aromatic sauce, making it ideal for gatherings or a cozy weeknight dinner.
For those who love pork but want to elevate it beyond basic roasting, this method delivers professional-level tenderness without requiring specialized equipment. The apple cider adds a touch of autumnal warmth, while the slow braising ensures every bite is juicy and packed with flavor.
Let's get started on creating a dish that's as impressive as it is delicious.
Ingredients for apple cider braised pork shoulder
Sixteen ingredients, but only two do the heavy lifting: that pork shoulder and the apple cider.
| Ingredient | Amount | Notes |
|---|---|---|
| Pork Shoulder 🐖 | 4 lb | Bone-in preferred, cut into 2-inch chunks |
| Apple Cider 🍎 | 2 cups | Unfiltered, preferably organic for depth |
| Yellow Onions 🧅 | 2 whole | Cut into 1-inch chunks, not pre-shredded |
| Carrots 🥕 | 4 whole | Cut into 2-inch pieces, any variety |
| Garlic Cloves 🧄 | 6 cloves | Smash lightly, not minced |
| Fresh Thyme 🌿 | ¼ cup | Stems removed, loosely packed |
| Beef Broth 🍲 | 2 cups | Low-sodium, homemade preferred |
| Brown Sugar 🍯 | ½ cup | Light or dark, packed |
| Black Peppercorns 🌶️ | 1 tbsp | Freshly cracked, not pre-ground |
| Bay Leaves 🍃 | 2 whole | Dried, standard size |
| Olive Oil 🫒 | ¼ cup | Extra-virgin, for searing |
| Salt 🧂 | 1 ½ tsp | Kosher or sea salt, adjust to taste |
| Apple Cider Vinegar 🍋 | 1 tbsp | For brightness in sauce |
| Fresh Rosemary 🌿 | ⅛ cup | Sprigs, for garnish |
The pork shoulder is non-negotiable here—look for a cut with good marbling from Whole Foods or your local butcher. Bone-in is ideal, as it adds flavor and structure, but boneless works if that's what you've got. Chunk it into 2-inch pieces for even cooking. For apple cider, Mott's or Woodchuck are reliable brands, but anything unfiltered and organic will give you that authentic depth. The onions and carrots should be firm and free of soft spots—Sweet onions add a touch of sweetness that pairs beautifully with the cider. Fresh thyme and rosemary from the market will elevate this beyond basic recipes, but dried works in a pinch at one-third the amount.
No apple cider? Substitute with a mix of apple juice and a splash of vinegar—just reduce the sweetness by half. Short on beef broth? Chicken broth works equally well, though it'll have a slightly different profile. The brown sugar can be swapped for maple syrup if you prefer, but it'll make the sauce slightly more liquid. For those who love a deeper flavor, add a splash of Worcestershire sauce to the braising liquid. The key is balancing sweetness and acidity—the cider vinegar helps cut through the richness of the pork and caramelized vegetables. If you're using a Dutch oven, make sure it's heavy enough to handle the searing and braising without warping.
This dish tastes even better the next day, so plan ahead. Store the pork and sauce in an airtight container in the fridge for up to 5 days, or freeze for 3 months—the flavors actually deepen over time. When reheating, cover the pot and simmer on low heat until everything is heated through. The sauce will thicken as it cools, so you can always thin it with a splash of water or broth if needed. For serving, garnish with fresh rosemary sprigs and a drizzle of the reduced apple cider sauce—it's the perfect touch to make this dish look as impressive as it tastes.
Why You'll Love This Recipe
- One-Pot Magic: I swear by this—just toss everything in a slow cooker or Dutch oven, walk away, and come back to fall-apart tender pork. No fancy techniques, no stress, and the apple cider does all the work while you’re busy (or binge-watching).
- Sweet-Savory Crunch: That caramelized edge on the pork? The way the onions and garlic mingle with the tangy cider? It’s like a hug in your mouth—rich, slightly sweet, with just enough bite to keep it interesting. My kids fight over the last bite (and I don’t even pretend to judge).
- Budget Win with Big Impact: Pork shoulder is the ultimate affordable cut, and apple cider stretches every ingredient into something luxurious. I’ve fed a crowd of six for under $20, and no one ever guesses it’s not some fancy restaurant dish. (Between us, they’ll ask for the recipe.)
Step-by-step instructions for apple cider braised pork shoulder
Transform tough pork into melt-in-your-mouth perfection with this slow-braised method.
Sear the Pork Shoulder for Deep Flavor
Heat a heavy Dutch oven over medium-high heat. Add the 0.25 cup olive oil and let it get hot but not smoking. Working in batches if needed, place the 4 lb pork shoulder in the pot, skin-side down. Press down gently with a spatula to ensure even contact—this prevents curling and ensures a crispy exterior. Sear for 5-6 minutes per side until the pork develops a deep golden-brown crust.
Remove the pork and set it aside. You want that crust to stay intact during braising, so don't be tempted to flip too early. If the oil starts to smoke excessively, reduce the heat slightly. The goal is a rich, caramelized foundation for your braise.
Build the Aromatic Base
In the same Dutch oven, add the 2 whole yellow onions and 4 whole carrots, cut into even pieces. Cook for 5 minutes, stirring occasionally, until they begin to soften and release their natural juices. Add the 6 lightly smashed garlic cloves and cook for another 30 seconds until fragrant.
Stir in the 0.25 cup fresh thyme, 1 tbsp freshly cracked black peppercorns, 2 whole bay leaves, and 1.5 tsp salt. Cook for 1 minute to toast the spices—this awakens their flavors before they meld with the pork. The spices should smell vibrant and warm, not burnt.
Deglaze and Combine Liquids
Pour in the 2 cups apple cider and scrape up any browned bits from the bottom of the pot with a wooden spoon. These bits are packed with flavor that would otherwise go to waste. Add the 2 cups beef broth and 0.5 cup brown sugar, stirring to combine. The mixture should be slightly syrupy but still pourable.
Return the pork shoulder to the pot, skin-side up. Bring everything to a gentle simmer over medium heat. Once it reaches a simmer, reduce the heat to low to maintain a steady, barely bubbling temperature. The liquid should just barely move when you give the pot a gentle shake.
Braise Until Fork-Tender
Cover the Dutch oven with a tight-fitting lid and transfer it to a preheated 300°F oven. Braise for 3 to 3.5 hours, checking occasionally to ensure the liquid hasn't evaporated too much. If it looks reduced by more than half, add a splash of water or broth to maintain adequate moisture.
About 1 hour before the pork is done, stir in the 1 tbsp apple cider vinegar. This adds a bright, tangy contrast to the rich flavors. The pork is ready when it easily pulls apart with two forks and the internal temperature reaches 203°F—this ensures it's fully tender and juicy.
Rest and Garnish for Presentation
Remove the pork from the pot and transfer it to a cutting board. Tent loosely with foil and let it rest for 15 to 20 minutes. This resting period allows the juices to redistribute throughout the meat, preventing them from running out when you slice.
Skimming the braising liquid with a ladle, discard the bay leaves. Taste the sauce and adjust the seasoning with additional salt if needed. To serve, slice the pork shoulder against the grain into ½-inch thick pieces. Ladle the braising sauce over the top and garnish with sprigs of the 0.125 cup fresh rosemary. Serve immediately with crusty bread or over mashed potatoes to soak up every last bit of that rich, apple-cider-infused sauce.
Pro Tips For Making Apple Cider Braised Pork Shoulder
- Sear the Pork First: That brown crust isn’t just for looks—it’s where all the flavor lives. Hit the pork shoulder with a hot skillet for 3-4 minutes per side before adding anything else. I used to skip this, and the dish always tasted like it needed more salt afterward.
- Use Whole Spices: Toss in a couple of cloves of garlic whole with the carrots and onions instead of mincing them. They’ll soften perfectly and infuse the cider without turning to mush. (Yes, even if you’re impatient like me.)
- Deglaze Aggressively: After searing the pork, don’t just splash in the cider—scrape the bottom of the pan with a wooden spoon first. Those stuck-on bits are packed with flavor, and skipping this step means losing half the taste. I learned this the hard way after making a second batch that tasted bland.
- Simmer Low and Slow: Once everything’s in the pot, keep the heat at a gentle simmer—low enough that you barely see bubbles. Rushing it turns the cider into a thin sauce and leaves the pork dry. My grandmother swore by this, and she was right: the pork falls apart when it’s ready, not before.
Common mistakes when making this dish
Over-Searing the Pork
Don’t let that pork shoulder turn into leather—over-searing creates a tough exterior that won’t break down during braising. I’ve seen beginners char the meat black, which burns off the natural flavors. Keep your heat at medium-high and sear just until golden-brown (5-6 minutes per side).
If your oil starts smoking wildly, reduce the heat immediately. The crust should be deep caramel, not burnt. 🔥
Skipping the Sear Entirely
Some cooks skip searing to save time, but that’s a big mistake. The Maillard reaction from searing builds deep, complex flavors that the apple cider braise can’t replicate alone.
Even a quick 3-minute sear makes a difference. If you’re short on time, at least pat the pork dry and brown it briefly—it’ll still taste better than unseared meat.
Using Pre-Shredded Vegetables
Pre-shredded onions and carrots release too much moisture too quickly, turning your braising liquid into soup before the pork is tender. Always use whole vegetables cut into even chunks—they’ll soften gradually and infuse the liquid with flavor instead of turning it watery.
I cut onions into 1-inch chunks and carrots into 2-inch pieces for perfect texture. 🥕
Not Enough Liquid
The braising liquid should cover at least half the pork when you start. If it’s too shallow, the meat will steam instead of simmer gently, leading to dry, tough results.
I’ve had to add ½ cup extra broth mid-cook because someone used a small pot. Use a Dutch oven with at least a 6-quart capacity to avoid this issue.
Ignoring the Resting Time
Skipping the 15-20 minute rest after braising means juices will spill out when you slice, leaving you with dry meat. I’ve seen home cooks rush this step and end up with disappointing results.
Tent the pork loosely with foil and let it rest—this is non-negotiable for juicy, fork-tender meat. Patience here makes all the difference. ⏳
Overcrowding the Pot
If you’re using a small Dutch oven, don’t overcrowd the pork—it needs room to develop that golden crust. Cook in batches if needed, and sear each piece thoroughly before adding it to the braise.
I’ve had to pull pork out of pots because it was packed too tightly, leading to uneven cooking. A 6-quart Dutch oven is ideal for a 4 lb shoulder with room to spare.
Nutrition facts
Frequently asked questions
Can I substitute apple cider with another liquid?
Yes, but the flavor will change. For a similar sweet-tart balance, use 1 cup apple juice + 1 tbsp apple cider vinegar per 2 cups of cider. If you prefer a richer sauce, try ½ cup red wine + 1 cup beef broth, but reduce the brown sugar to ¼ cup to avoid excess sweetness. The key is maintaining acidity to cut through the pork's richness.
How do I know when the pork is fully tender?
Use the fork test: When the pork easily pulls apart with two forks and reaches an internal temperature of 203°F, it's done. The meat should feel soft and almost jelly-like when pressed gently. If it's still slightly firm, return it to the oven for 30 more minutes—patience is key for perfect texture.
Can I make this recipe on the stovetop instead of the oven?
After searing, cover the Dutch oven and simmer on low heat for 3-3.5 hours, adding water or broth as needed to maintain the liquid level. The stovetop method requires more attention, but it works well for smaller batches. Just ensure the liquid barely simmers—too vigorous a boil can make the meat tough.
What’s the best way to reheat leftovers?
Reheat gently in the same Dutch oven over low heat with a splash of water or broth to prevent drying. Cover and simmer for 10-15 minutes until heated through. The sauce will thicken further, so thin it with a little extra liquid if needed. Leftovers actually taste better the next day as flavors meld—store in an airtight container for up to 5 days.
Why does my sauce turn out too sweet?
This usually happens when the apple cider's natural sweetness isn't balanced by acidity. Stir in 1 extra tbsp of apple cider vinegar during the last 30 minutes of cooking to brighten the flavor. If the sauce is still too sweet, add a pinch of salt to enhance the savory notes. Taste as you go—adjustments make all the difference!