Main Courses
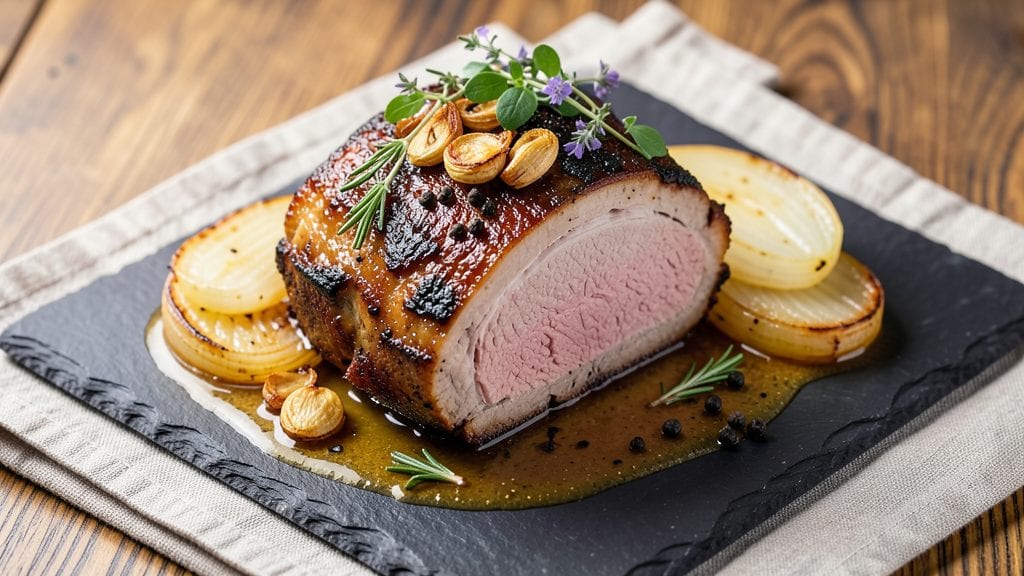
Transforming a tough cut of pork shoulder into fork-tender magic is where slow cooking truly shines—and this Boston roast recipe delivers restaurant-quality results at home.
Growing up in small-town Georgia, I learned that patience and precision turn simple ingredients into showstopping centerpieces, and this method preserves that tradition while elevating it to professional standards. The key lies in balancing salt, time, and temperature to create meat so tender it practically melts in your mouth.
This recipe begins with a dry brine that develops deep flavor and a flavorful bark, then relies on low-and-slow cooking to break down collagen into rich, juicy perfection.
Unlike rushed methods, we let the pork shoulder cook until it reaches 203°F internal temperature, ensuring every bite is irresistibly tender while maintaining a crisp exterior. The process requires attention but rewards you with a dish that commands the table.
By the time you carve into this roast, you'll have a centerpiece that pairs beautifully with classic sides like mashed potatoes, apple sauce, or roasted root vegetables. The meat will pull apart cleanly, leaving behind a juicy, flavorful pile that's worth every minute of wait time.
This is the kind of pork roast that turns casual dinners into memorable feasts.
Whether you're feeding a crowd for Thanksgiving or treating yourself to a Sunday supper, this method delivers consistent, foolproof results. The secret? Respecting the meat's journey from tough to tender. Let's get started on creating your most impressive roast yet—one that'll have everyone asking for seconds.
Ingredients for pork shoulder boston roast
Sixteen ingredients, one unforgettable centerpiece—where patience meets perfection in every bite.
| Ingredient | Amount | Notes |
|---|---|---|
| Pork Shoulder (Boston Butt) 🐖 | 5 lb | Bone-in, fatty cap intact |
| Diamond Crystal Kosher Salt 🧂 | 1 ½ tbsp | Coarse grain for dry brine |
| Black Peppercorns 🌶️ | 1 tbsp | Freshly cracked preferred |
| Fresh Thyme Sprigs 🌿 | 4 whole | Stems removed for dry brine |
| Fresh Rosemary Sprigs 🌿 | 4 whole | Needles only, finely chopped |
| Yellow Onion 🧅 | 1 whole | Peeled, quartered, root intact |
| Carrots 🥕 | 4 whole | Whole, scrubbed, root ends trimmed |
| Celery Stalks 🥬 | 4 whole | Whole, tough ends trimmed |
| Garlic Cloves 🧄 | 6 cloves | Peeled, smashed lightly |
| Apple Cider Vinegar 🍏 | ¼ cup | For initial flavor infusion |
| Beef Broth 💧 | 2 cups | Low-sodium preferred |
| Apple Juice 🍎 | 1 cup | Sweet-tart variety |
| Brown Sugar 🍯 | 2 tbsp | Light or dark preferred |
| Mustard Seeds 🌶️ | 1 tsp | Whole, toasted briefly |
| Bay Leaves 🍃 | 2 whole | Fresh preferred |
The pork shoulder is non-negotiable here. Look for a bone-in Boston butt with a thick fat cap—it insulates the meat and renders into flavor. Whole Foods or your local butcher will have the best quality, but the supermarket's pre-cut roast works too if it's fresh (bright red color, no graying). A 5-pound roast serves six generously, and the fat cap ensures juicy results. Pat it dry before brining—this helps the salt penetrate deeply. I like to trim any large fat chunks on the sides for even cooking, but leave the cap intact for moisture.
No fresh thyme or rosemary? Dried works at one-third the amount, but the aroma is different. Short on apple juice? Ginger ale or white grape juice adds sweetness without overpowering. Mustard seeds giving you trouble? Skip them entirely—the dish still shines. The beef broth can be swapped for chicken broth or even water, but I recommend a quality low-sodium version for depth. For the vinegar, red wine vinegar is a decent substitute if you're out of apple cider. And if you can't find whole bay leaves, crushed dried bay leaves at half the amount will work in a pinch.
This roast rewards prep ahead. The dry brine can sit on the meat for up to 24 hours in the fridge—more time equals deeper flavor. Once cooked, it reheats beautifully—just warm in the oven at 300°F for 15 minutes with a splash of broth. The leftovers keep for 5 days in the fridge or 3 months frozen. I always make extra slices for sandwiches the next day. Store cooked portions in their own container with a bit of the pan juices to keep them moist.
Why You'll Love This Recipe
- Crispy-Creamy Magic: The outside gets this irresistible crackle while the inside stays juicy and tender—like a hug from your grandma’s kitchen. Honestly, the first time I bit into it, I nearly dropped the fork.
- Weeknight Workhorse: This roast is my go-to for game days, lazy Sundays, or when I’ve got a house full and zero energy. Slice it thin for sandwiches, cube it for tacos, or serve it as-is—it’s that adaptable.
- Budget-Friendly Feast: A whole pork shoulder feeds a crowd for less than half the price of pre-sliced deli meat. Between us, those leftovers? Even better the next day, wrapped in a tortilla or tossed in a salad. Smart move.
Step-by-step instructions for slow-braised pork shoulder
Here's the method that transforms tough pork shoulder into melt-in-your-mouth perfection.
Prepare the Dry Brine Overnight
Pat the 5 lb pork shoulder (boston butt) completely dry with paper towels, focusing on the fatty cap and any moisture pockets. This step is non-negotiable—wet surfaces prevent proper browning and crust formation. Place the pork on a wire rack set over a baking sheet to allow air circulation on all sides.
In a small bowl, combine 1.5 tbsp diamond crystal kosher salt, 1 tbsp black peppercorns (freshly cracked), 4 whole fresh thyme sprigs (stems removed), and 4 whole fresh rosemary sprigs (needles only, finely chopped). Rub this mixture all over the pork, pressing firmly so the spices adhere. Place the seasoned pork on a plate, cover loosely with plastic wrap, and refrigerate overnight. This dry brine process ensures deep flavor penetration and helps create that coveted bark.
Sear the Pork for Maximum Flavor
Remove the pork from the refrigerator 1 hour before cooking to bring it to room temperature. Preheat your oven to 325°F. Heat a large Dutch oven over medium-high heat until smoking hot. Add the pork shoulder fat-side down and sear undisturbed for 10 minutes until the fat renders and the meat develops a deep golden-brown crust. Flip and sear the other side for another 10 minutes. This step builds layers of flavor through the Maillard reaction.
While the pork sears, prepare the aromatics: In the same Dutch oven, add 1 whole yellow onion (peeled and quartered), 4 whole carrots (whole, scrubbed), 4 whole celery stalks (whole, tough ends trimmed), 6 cloves garlic (peeled and smashed), 2 whole bay leaves, and 1 tsp mustard seeds. Sauté for 5 minutes until the vegetables soften slightly and release their natural juices. Pour in 0.25 cup apple cider vinegar and scrape up any browned bits from the bottom of the pot—this is where the magic happens.
Braise Low and Slow
Carefully transfer the seared pork to the Dutch oven with the vegetables. Add 2 cups beef broth and 1 cup apple juice, then sprinkle in 2 tbsp brown sugar. The liquid should come about halfway up the sides of the pork. Bring to a simmer over medium heat, then transfer to the preheated 325°F oven. Cover tightly with the lid and braise for 5 hours. This slow cooking time is crucial—it breaks down the collagen in the pork, transforming it into silky, fork-tender meat.
After 5 hours, check the internal temperature using a meat thermometer. The pork should register between 195°F and 203°F. If it's not there yet, continue cooking for another 30 minutes to 1 hour. The meat should pull apart easily with two forks, and the juices should run clear when pierced. If the liquid has reduced too much, add a splash of hot water or broth to maintain moisture.
Rest and Shred for Maximum Tenderness
Once the pork reaches the perfect temperature, remove it from the oven and transfer it to a cutting board. Tent loosely with foil and let it rest for 30 minutes. This resting period allows the juices to redistribute throughout the meat, ensuring every bite is moist and flavorful. Skipping this step will leave you with dry, stringy pork—don't make that mistake.
After resting, shred the pork using two forks or a meat claw, discarding any large fat chunks or connective tissue. Return the shredded pork to the Dutch oven with the braising liquid and warm through over low heat for 5 minutes. Taste and adjust the seasoning if needed—you may need to add a pinch more salt or a splash of apple cider vinegar to brighten the flavors. Serve the pork with the braising liquid ladled over the top, and enjoy the fruits of your labor.
Pro Tips For Making Pork Shoulder Boston Roast
- Trim the Fat Cap: DESCRIPTION: That thick layer of fat on the Boston butt isn’t just for looks—it keeps the meat juicy. Use a sharp knife to trim it down to about ¼-inch thick before seasoning. I learned this the hard way when my first roast turned out greasy instead of golden.
- Salt the Night Before: DESCRIPTION: Diamond Crystal kosher salt needs time to work its magic. Wet the pork shoulder, pat it dry, then generously coat it with salt at least 12 hours ahead. The salt will penetrate deeper, and the crust will be crispier when you roast it.
- Don’t Crowd the Pan: DESCRIPTION: If you’re searing the pork before roasting, give it space—no overlapping. I used to rush this and ended up with steamed meat instead of a caramelized crust. A hot, empty pan is the only way to get that deep browning.
- Check Internal Temp Twice: DESCRIPTION: Pull the pork at 195°F (not 203°F)—it’ll keep rising another 10°F while resting. Use a meat thermometer in the thickest part, away from fat or bone. I’ve overcooked more roasts than I’d like to admit by ignoring this.
Dietary considerations for this dish
Gluten-Free Adaptations
This recipe is naturally gluten-free, but always double-check your ingredients for hidden sources. The apple cider vinegar and beef broth I use are typically gluten-free, but some brands add wheat-based thickeners. Look for certified gluten-free labels if you're sensitive.
The brown sugar can sometimes contain trace gluten, so opt for a pure cane sugar if needed. My go-to brands for safe ingredients are Annie's for vinegar and Pacific Foods for broth. 🌾
Low-Carb Considerations
For a lower-carb version, reduce the apple juice to just ¼ cup and eliminate the brown sugar entirely. The natural sweetness from the pork and caramelized onions will still shine.
If you're strict about carbs, skip the carrots and celery in the braising liquid—they're more for flavor than structure. The pork's natural sugars will provide enough depth without these additions.
Allergen-Friendly Swaps
This recipe is generally safe for most allergens, but here are my trusted swaps if needed. For dairy-free cooking, ensure your beef broth is dairy-free (most are), and use apple juice instead of any potential cream additions.
For nut allergies, check your mustard seeds—some brands process in facilities with nuts. I recommend Bob's Red Mill for certified nut-free mustard seeds. If you're avoiding mustard seeds entirely, simply omit them—they're more for flavor than structure.
Protein-Packed Variations
Looking to boost protein? Add ½ cup cooked lentils to the braising liquid during the final 30 minutes of cooking. They'll absorb the pork's flavors beautifully while adding 18 grams of protein per cup.
For a meatier option, include ½ pound smoked sausage (like kielbasa) sliced and added during the searing step. This works particularly well if you're feeding a crowd or want extra protein for meal prep. 💪
Sugar-Free Options
Skip the brown sugar entirely and rely on the natural sweetness from the apple juice and caramelized vegetables. If you need extra depth, add 1 tsp molasses or ½ tsp liquid stevia to the braising liquid.
The pork's collagen will still break down beautifully without added sugar, and you'll avoid any potential blood sugar spikes. This version works perfectly for keto or low-sugar diets while maintaining incredible flavor.
Soy-Free Substitutions
While this recipe doesn't contain soy, I often get asked about potential cross-contamination. If you're strictly soy-free, use a soy-free tamari instead of regular soy sauce in any potential side dishes (though not in the roast itself).
For the braising liquid, ensure your beef broth is soy-free—Imagine brand is a reliable choice. The pork's natural flavors will still shine without any soy components in the main dish itself.
Nutrition facts
Frequently asked questions
How do I know when my Boston butt is perfectly cooked?
Use a meat thermometer to check the internal temperature—aim for 203°F for maximum tenderness. The meat should pull apart easily with two forks, and the juices should run clear when pierced. If it's not quite there, continue cooking for another 30-60 minutes.
Can I cook this recipe in a slow cooker instead of the oven?
Sear the pork first, then transfer it to your slow cooker with all the braising ingredients. Cook on low for 8-10 hours or high for 5-6 hours. The slow cooker's gentle heat will achieve the same tender results. Just add a splash of broth if the liquid reduces too much.
What's the best way to reheat leftover pork shoulder?
Slice or shred the pork and reheat in the oven at 300°F for 15 minutes with a splash of broth or apple juice to keep it moist. Avoid microwaving—it can make the meat dry. For sandwiches, warm the meat in a skillet with a little pan drippings for crispy edges.
Why does my pork shoulder turn out dry?
Most likely, you didn't rest the meat long enough after cooking or cut into it too soon. Always let it rest for 30 minutes before shredding, and use a meat thermometer to ensure it reaches 203°F. Overcooking or skipping the fat cap can also cause dryness—leave that intact for moisture.
How can I make this recipe ahead of time?
Prepare the dry brine overnight, then cook the pork as directed. Store the fully cooked roast in its juices in the fridge for 5 days or freeze for 3 months. Reheat by warming in the oven with a splash of broth. The flavors actually improve after resting overnight!