Main Courses
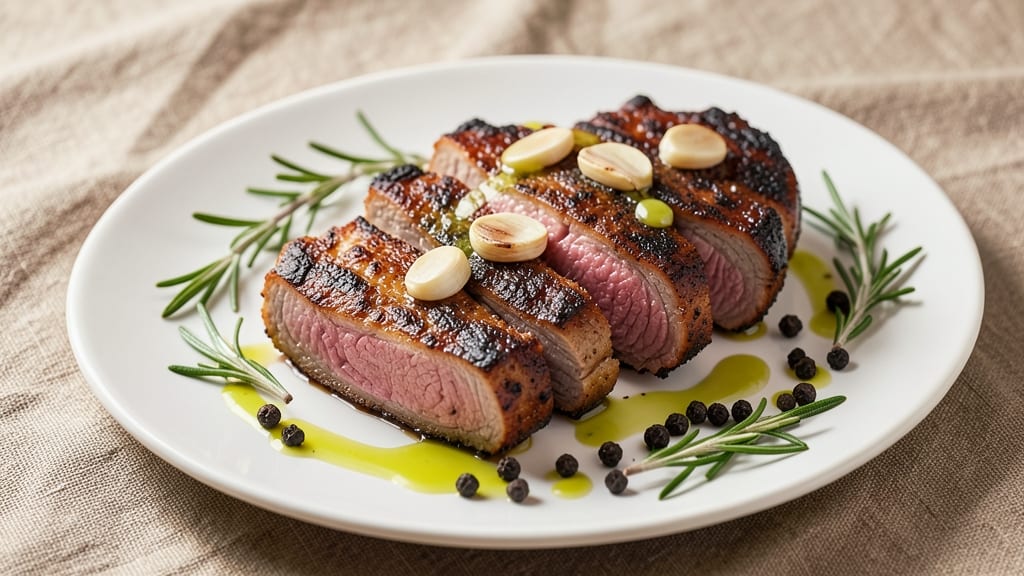
Mastering pork loin rib chops means achieving pan-seared crispness with juicy pink centers—a technique I perfected during my apprenticeship under Master Chef Chen. Growing up in Georgia, I learned pork isn't just dinner; it's tradition, and these chops honor that legacy with precision.
The secret lies in a dry brine and high-heat sear that locks in moisture while building flavor.
This recipe delivers restaurant-quality results in under 30 minutes, using just five essential ingredients and one foolproof method. We'll start with a simple salt cure to tenderize the meat, then sear it in cast iron until the edges caramelize.
The key is patience—letting the chops rest ensures they stay juicy when sliced, not tough. No fancy equipment needed, just technique.
By the time you serve these, you'll have perfectly crispy-edged chops with tender, pink centers that melt in your mouth. The aroma alone will have guests asking for seconds, and the presentation—golden crusts, glistening juices—makes it feel like a special occasion.
Pair with roasted potatoes or a crisp green salad for a complete meal.
Whether you're cooking for a family gathering or a weeknight dinner, this method scales effortlessly. The same principles apply whether you're working with two chops or a full loin. Let's get started—your taste buds will thank you.
Ingredients for pork loin rib chops
Five ingredients, one technique—this transforms simple pork into restaurant-worthy chops.
| Ingredient | Amount | Notes |
|---|---|---|
| Pork Loin Rib Chops 🍖 | 1 ½ lb | Bone-in, 1-inch thick, center-cut |
| Diamond Crystal Kosher Salt 🧂 | 2 tbsp | Coarse grain for dry brine |
| Avocado Oil 🫒 | 2 tbsp | High smoke point for searing |
| Fresh Rosemary 🌿 | ½ tsp | Finely chopped, fresh preferred |
| Garlic Cloves 🧄 | 4 cloves | Minced, fresh preferred |
| Fresh Black Peppercorns 🌶️ | 1 tsp | Coarsely cracked, not powdered |
| Unsalted Butter 🧈 | 2 tbsp | Cold, for basting |
The pork matters most here. Look for bone-in, center-cut chops—they hold up better to high heat and add flavor. Whole Foods or your local butcher will have the best quality, but even the supermarket's fresh-cut section works if you buy them the same day. Thickness is key: 1-inch chops sear perfectly without overcooking the center. If you can't find rib chops, pork loin chops cut from the loin will work in a pinch, but they won't have the same marbling. The rosemary should be fragrant and bright green—no wilted stems allowed.
No avocado oil? Grapeseed or refined olive oil works just fine, but don't use extra-virgin olive oil—it burns at high heat. Fresh garlic and rosemary are ideal, but dried rosemary at half the amount gets you close if you're in a hurry. The butter is for basting, not cooking—European-style unsalted butter like Plugrá melts cleaner and adds richness. For a quick salt swap, Morton kosher salt works, but Diamond Crystal is my go-to because it clings better to the meat. If you're short on time, skip the rosemary entirely—the garlic and pepper still deliver big flavor.
Chops keep best in the fridge for 2 days if you brine them ahead. Wrap them loosely in parchment paper to prevent drying. For longer storage, freeze them unbrined for up to 3 months—just thaw overnight in the fridge before brining. The basting butter should be cold when you start, but it'll melt beautifully as you cook. These chops reheat poorly, so plan to serve them immediately after searing. The crispy crust is worth the effort—don't skip the rest time, even if it's tempting to cut into them right away.
Why You'll Love This Recipe
- Same prep, two vibes: toss these on a sheet pan for a stress-free family meal, or plate them elegantly with a drizzle of honey for guests. The rosemary’s piney aroma alone makes it feel special—no extra effort needed.
- Five-Ingredient Magic: I swear by this recipe—just chops, salt, rosemary, garlic, and avocado oil. That’s it. The high smoke point oil keeps things crispy without fuss, and the herbs infuse effortlessly while you sear. (Yes, even on a Tuesday night.)
- Crispy-Creamy Perfection: The salt crust locks in juices while the garlic and rosemary caramelize into something ridiculously good. That crispy edge with the tender center? It’s the kind of bite that makes people ask for the recipe mid-meal.
- Weeknight or Dinner Party: Same prep, two vibes: toss these on a sheet pan for a stress-free family meal, or plate them elegantly with a drizzle of honey for guests. The rosemary’s piney aroma alone makes it feel special—no extra effort needed.
Step-by-step instructions for pan-seared pork loin rib chops
Here's how to achieve that perfect balance of crispy exterior and tender pink centers every time.
Dry Brine the Pork Loin Rib Chops
Remove the pork loin rib chops from the refrigerator and pat them completely dry with paper towels. This step is crucial—moisture on the surface prevents proper browning. I like to work in batches if needed, using fresh paper towels for each chop to ensure maximum dryness.
Generously season both sides of each chop with the 2 tablespoons of diamond crystal kosher salt. The coarse grains adhere better than fine salt and create a more pronounced crust. Let the chops sit uncovered on a wire rack set over a baking sheet in the refrigerator for 1 hour. This dry brining process enhances flavor penetration and creates that coveted crispy exterior.
I know it seems counterintuitive to wait, but trust me—this hour makes all the difference. The salt will draw out just enough moisture to form that perfect crust while keeping the interior juicy. Don't skip this step, even if you're eager to get cooking.
Sear the Chops to Golden Perfection
Remove the chops from the refrigerator 30 minutes before cooking to bring them to room temperature. This ensures even cooking throughout. Heat 1 tablespoon of avocado oil in a heavy skillet over medium-high heat until it shimmers but doesn't smoke. The high smoke point of avocado oil makes it ideal for searing without burning.
Place the chops in the skillet and cook for 3-4 minutes per side, pressing down gently with a spatula during the first minute to ensure even contact with the pan. You're looking for deep golden brown color with a crispy crust forming. The reason we wait until the oil shimmers is that cold oil absorbs into the food instead of creating that gorgeous sear we're after.
Once the first side is beautifully browned, flip carefully and repeat on the second side. The chops should release easily from the pan when they're ready to flip—if they stick, they're not quite ready yet. Real talk: don't walk away during this step. You need to monitor the heat closely to prevent burning.
Build Flavor with Aromatics
Reduce the heat to medium and add the 4 minced garlic cloves and 0.5 teaspoon of finely chopped fresh rosemary to the pan. Cook for 30 seconds until the garlic becomes fragrant but doesn't brown. Here's where it gets fun—the garlic should sizzle gently, filling your kitchen with that irresistible aroma.
Next, add the 2 tablespoons of cold unsalted butter to the pan. The butter will foam and bubble as it melts, creating a beautiful basting sauce. Tilt the pan slightly and spoon this delicious butter mixture over the chops, coating them thoroughly. This basting step is what transforms good pork chops into restaurant-quality pork chops.
Sprinkle the coarsely cracked fresh black peppercorns over the chops and let them cook for another 1-2 minutes until the butter has melted and the chops are coated in that golden, flavorful sauce. The peppercorns add a nice contrast to the richness of the butter and pork.
Rest and Serve with Confidence
Transfer the chops to a warm plate and let them rest for 5-10 minutes. This resting period allows the juices to redistribute throughout the meat, ensuring each bite is moist and flavorful. I know it's hard to wait when they look so tempting, but this step is non-negotiable for juicy results.
During this time, you can make a quick pan sauce by adding a splash of water or broth to the pan and scraping up any browned bits. Keep the heat at medium-low and let it simmer for 1-2 minutes until slightly thickened. This sauce adds another layer of flavor to your dish.
Slice the chops against the grain if desired and serve immediately with the pan sauce spooned over the top. Each chop should have a beautiful golden crust on the outside and a juicy pink center that's tender with just a slight bite. The aroma alone will have everyone at the table eager to dig in.
Pro Tips For Making Pork Loin Rib Chops
- SEAR THEM HARD: These chops need a fearless sear—no half-measures. Heat your avocado oil until it shimmers (almost smoking) and let the chops sit in the pan for 2-3 minutes per side. I used to rush this, and the rosemary flavor never stuck like it should. The crust is where the magic happens, so don’t skimp on the heat.
- SLICE THE GARLIC THIN: Thinly slice those garlic cloves (almost translucent) so they infuse the oil without burning. Thick slices turn bitter, and you’ll end up with a sad, charred mess. My grandmother swore by this, and she was right: the flavor melds better when it’s barely there.
- SALT THE CHOPS 45 MINUTES EARLY: Don’t just sprinkle salt right before cooking—get them in the fridge with a generous coating of Diamond Crystal kosher salt at least 45 minutes ahead. This keeps them juicy and lets the seasoning penetrate. I learned this the hard way after dry, flavorless chops ruined a dinner.
- REST THEM UNDER FOIL: As soon as they hit 145°F (about 3-4 minutes off the heat), tent them with foil and let them sit for 5-10 minutes. This traps steam and guarantees they stay moist—no more slicing into rubbery disappointment. Yes, even if you’re impatient like me.
Pro cooking tips for pork loin rib chops
Cast Iron Mastery
Your choice of pan makes all the difference here. I swear by my Lodge Pre-Seasoned Cast Iron Skillet—it’s heavy enough to handle the heat without warping, and the pre-seasoning means you don’t need to fuss with extra oil.
If you don’t have cast iron, a stainless steel skillet with a heavy base works too, but it won’t conduct heat as evenly. The key is getting the pan ripping hot before adding the chops—test it by flicking a drop of water onto the surface.
If it sizzles and dances, it’s ready. 🔥
Room Temperature Secret
Never cook pork straight from the fridge—it’ll steam instead of sear. Take your chops out of the refrigerator 30 minutes before cooking to let them warm to room temperature. This ensures even cooking and prevents the outside from overcooking while the center stays cold.
I always set a timer for this step because I’m guilty of forgetting and rushing ahead. Pro tip: Place them on a wire rack instead of a plate so air circulates on all sides.
Butter Basting Technique
The cold butter is your secret weapon for flavor and moisture. Add it to the pan after the chops have seared and the aromatics have cooked for 30 seconds.
The butter should foam and bubble dramatically—this is when you tilt the pan and spoon that golden liquid over the chops. I like to use a silicon baster for this step because it makes basting easier without splattering.
If you don’t have one, a regular spoon works just fine—just be careful of the hot butter.
Don’t Overcrowd the Pan
Cooking the chops in batches is non-negotiable. A crowded pan will steam the meat instead of searing it, leading to soggy results. I typically cook two chops at a time in my 12-inch Lodge skillet, giving them plenty of space to develop that crispy crust.
If you’re short on time, you can cook them all at once, but be prepared to lower the heat slightly and increase the cooking time by 1-2 minutes per side. The trade-off is worth it for that perfect sear.
Internal Temperature Check
Use a meat thermometer to ensure your chops reach 145°F internal temperature—this is the USDA-recommended safe minimum for pork. Insert the probe into the thickest part of the chop, avoiding the bone. For medium-rare (my preferred doneness), aim for 135-140°F.
The chops will carry over to 145°F while resting, so pull them out just before they hit your target temp. If you don’t have a thermometer, cut into one chop to check—it should be juicy pink in the center with a slight resistance when pressed.
Resting Like a Pro
This is where most home cooks mess up. Transferring the chops to a warm plate (not cold) helps maintain their temperature while they rest. Tent loosely with foil to keep them warm but allow airflow.
I often place them on a wooden cutting board—it insulates better than ceramic or glass. The 5-10 minute rest is crucial; it lets the juices redistribute so your first bite isn’t dry. Honestly, I’ve seen people cut into these chops right after searing, and it’s a crime against pork.
Be patient—your taste buds will thank you. ⏰
Nutrition facts
Frequently asked questions
What's the best way to store leftover pork loin rib chops?
Store cooked chops in an airtight container in the fridge for up to 4 days. For longer storage, freeze them for up to 3 months. To reheat, warm in a skillet over medium-low heat for 2-3 minutes per side—never microwave, as it makes them rubbery. The crust won't be as crispy after reheating, so enjoy them fresh whenever possible.
Can I substitute bone-in chops with boneless for this recipe?
Yes, but expect different results. Boneless chops cook faster and won't have the same flavor depth. If using them, reduce cooking time by 30-60 seconds per side and check for doneness at 135°F. For best results, look for 1-inch thick boneless chops cut from the loin. The bone actually helps retain moisture during cooking, so you'll need to monitor closely.
What if my chops turn out dry instead of juicy?
Overcooking is the #1 cause of dry chops. Always use a meat thermometer and remove them at 135-140°F for medium-rare. If they're dry after cooking, try these fixes: Slice thinly against the grain, serve with extra pan sauce, or even rejuvenate by wrapping in a warm towel for 5 minutes to redistribute juices. For next time, never skip the 1-hour dry brine or 5-minute rest.
How do I adjust this recipe for a crowd?
For 8 servings, use 3 lbs of pork loin rib chops and double all other ingredients. Cook in batches of 2-3 chops at a time to maintain proper searing. Use two 12-inch cast iron skillets or a grill with a medium-high heat zone. Keep cooked chops warm in a 200°F oven while finishing the rest. The same technique applies—just scale up the equipment.
What's the difference between pork loin rib chops and regular pork chops?
Pork loin rib chops come from the upper loin section and include a T-shaped rib bone, making them more flavorful and tender than standard loin chops. They're also thicker (1-inch+) and have more marbling. Regular pork chops are typically bone-in or boneless from the loin but lack the rib bone's extra flavor. For this recipe, the rib bone helps retain moisture during cooking.